|
Chebacco Construction
Page 8
|
|
|
| Date |
Work Completed |
Time Estimate |
Photos |
| 12/11/04 |
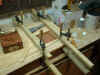
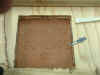
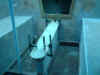
Poured lead counterweights into CB. The lead
was obtained from a local gun shop, sold to be cast into bullets or
fishing weights, I assume. It looked to be local produced and was melted
down wheel weights. At 50 cents a pound, it was a pretty good deal. To
prepare, I cut a 6x6" hole in the CB as indicated on the plans. I
then routed around the edge with a dovetail bit to create an undercut to
help hold the lead in place. I also inserted screws half-way driven into
the void to lock the lead in. A half-inch ply backing sheet with a bit of
aluminum foil was clamped on tightly to seal the area to be cast. I wanted
to cast my name and the date of building into the lead, so I tamped down
some raw delft clay I had from previous attempts at jewelry making and
carved the information into the clay. I tried several tools to make the
marks, what worked best was a V-shaped wood gouge from an Xacto knife set.
This cut the clay away rather than just pushing it around. ALERT!
If you do this, remember that you are making a mold, so what ever you
scribe into the clay needs to be a mirror image of what you want to appear
in the lead! I was nearly done the clay work before I remembered that
detail and had to start again. Needless to say I would have been quite
upset if I had gone ahead!
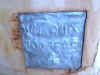
To melt the lead I used a large propane cooker
set to about 40% heat and an old gallon paint can. Lead is toxic, and the
fumes from the old can were not too nice either, so do this outside or in
a well ventilated space! Heating started with 3
or 4 pounds of lead, with 3 pounds added each time the mass in the pot
melted. This worked OK, but I recommend a sturdier pot as I sprung a leak
right after making the pour. Apparently the heat stressed the bottom joint
and it started dribbling molten lead where I had held it with pliers to
make the pour. Not a major disaster, but that may be been more luck than
I'd like to depend upon. Other than the dribble, the pour went
uneventfully.
As the lead cooled, I started sanding the
topsides on the boat. |
6 hrs |

|
| 12/12/04 |
Final sanding and first coat of varnish applied
to rub rails, toe rails, and main hatch trim. |
1 hr |
|
| 12/19/04 |
Glassed one side of CB, touched up epoxy job on
aft hatch covers. |
1.5 hrs |
|
| 12/20 -21/04 |
Finished glassing both sides of CB. |
3.5 hrs |
|
| 12/22/04 |
Sanded inside cockpit - only the difficult to
reach inside corners left to go! Sanded and applied 2nd coat of varnish to
rub rails, toe rails, and cabin hatch trim. |
3 hrs |
|
| 12/23/04 |
Cleaned up epoxy job on CB, identified a few
areas needing additional epoxy touch up. Mortised in hinges on aft hatch
covers. Finish sanded main and aft hatch covers, began varnishing. Also
varnished rub rails, etc. |
6 hrs |
|
| 12/26 -30/04 |
Finished varnishing hatch covers. I didn't like
the finish left by the glossy varnish, so I tried rubbing with steel wool
- much improved look and feel! Also touched up epoxy spots on CB and on
boat where sanding cut through to fiberglass. |
8 hrs |
|
| 12/31/04 |
Experimented with making wooden blocks. Tried a
mortised shell using 2x douglas fir. This worked OK, and it passed
preliminary stress tests by holding my body weight without breaking. I'm
not sure if this is the way to go though, so also glued up an all oak
block and a ply and douglas fir block body to try a rope stropped block.
Cut 4 sheaves from high density plastic - aka an old cutting board. Search www.duckworksmagazine.com
for block building details - they have 2 or 3 good articles.
Sanded, sanded, sanded inside corners on boat. Not done yet, but
getting there. Cleaned up the mess and continued varnishing the brightwork. |
8 hrs |
 |
| 1/1/05 |
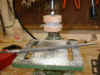
A 70-degree day for new years! Must work on the
boat...
Cut, fit, and installed the CB trunk trim. The trim is glued up from
white oak T&G flooring and looks quite nice (not that you can tell
from this fuzzy photo...). I inset a piece of HD
plastic from the cutting board where the CB line will rub - probably not
necessary, but it seems like a good idea. Fit the hinges on the aft
hatch covers. More varnish work at the end of the day. Off of the boat, I
worked on shaping the glued up block shells and applied tung oil
finish. |
8 hrs |
  |
| 1/2/05 |
Sanded CB trunk trim, cleaned up mess, and
applied varnish to various brightwork on the boat. Inside, I prototyped
the aft hatch hold down dogs from white oak, varnished the motor mount and
mizzen mount pieces. |
4 hrs |
|
| 1/15/05 |
Experimented with making
copper pipe thimbles for blocks. I settled on using 1/2" pipe about
9/16" long before shaping. Assembled one block with manila stropping
and tarred marlin whipping. This seems to work well. |
1hr |
 |
| 1/16/05 |
Made 11 more thimbles and
cut the rest of the sheave needed. Cut and glued up block bodied from oak.
Assembled one more prototype block to completion. |
5 hrs |
 |
| 1/17/05 |
Continued working on blocks:
cut blanks, routed, shaped, and sanded 5 block bodies. Applied 1st coat of
tung oil finish. |
5 hrs |
|
| 1/18 - 23/05 |
Applied 3 more coats of oil
finish to blocks. Assembled all blocks. |
5 hrs |
|
| 1/30/05 |
Started assembly on mizzen
sail kit. Finished all the machine sewing today. |
5 hrs |
|
| 2/5 - 8/05 |
Cut and glued up oak planks
for companionway hatch boards. Sanded and made final fit. Started
varnishing same. |
7 hrs |
|
| 2/13/05 |
Worked on tiller to rudder
post connection. More varnishing. |
3 hrs |
|
| 2/19/05 |
Finished mizzen sail (1hr),
varnished (.5 hr), worked on tiller/rudder post (1.5hrs), started sewing
mainsail (3hrs) |
6 hrs |
|
| 2/20/05 |
Continued mainsail work.
Over all, this is not too bad except for finding ways to position the sail
so that it can go through the sewing machine without hanging up on
something. The Sailrite instructions are easy to follow, sewing is not
difficult, even through multiple layers. |
4 hrs |
 |
| 2/21 - 3/5/05 |
Hand sew patches, rings,
install grommets |
6 hrs |
|
| 3/12 - 15/05 |
Cut and fit plexiglass
inserts and brass rings for portholes. I used a jigsaw to cut the inside of
the brass ring after drilling a starter hole. A bandsaw with a fine toothed
blade made short work of the outside cuts. |
2 hrs |
|
| 3/19/05 |
Misc. sanding to prep for
paint. Varnished inside of cabin and the tiller. Made a few epoxy
touch ups. Getting close to painting! |
3 hrs |
|
| 4/2/05 |
Scrubbed boat inside and out
to prepare for paint. Used water and TSP, rinsed with clear water. Bailed
and sponge dried everything. |
2 hrs |
|
| 4/3/05 |
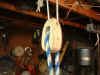
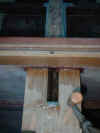
Cut and assembled spars. I
was able to cut enough out of three 2x8x20 and one 2x6x14 douglas fir planks
to make all the spars except for the spirit boom. Most spars were just two
layers of appropriate size epoxyed together to make up the size of the rough
cut spar. The main mast was a little trickier, requiring 3 layers with the
middle layer being ripped to size in two dimensions. The photo at left shows
a piece of scrap cut off of the end of the main mast positioned on the side
of the mast to show two aspects. There are three members within the middle
layer: the outer two members are full 20' length, the middle layer is only 5
' at the top and bottom of the mast to support through-bolting. At this
point the main mast almost requires two people to move due to weight and
bulk; once it is shaped it is easier for one person to handle. |
8 hrs |
 |
|
|
|
|
|
Go to Construction Page 1,
2, 3,
4, 5,
6, 7,
9 |
|
|
|
Home |
|
|
|
|
|
|


