| |
Chebacco Construction
Page 2
|
|
|
| Date |
Work Completed |
Time Estimate |
Photos |
| 9/18 - 10/3/03 |
Hurricane Isabel put a hold on
construction for awhile. Ten days without power and then the clean up
slowed us up some. One tree down, no real damage, but this was a close
call for the van. |
|


|
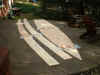
| 10/4/03 |
Glued up bottom and side joints
using the method described by Payson - lay down a layer of waxed paper,
the ply, then apply epoxy and a 4 inch wide strip of glass. Top that more
waxed paper and work out the air bubbles. I added a couple of temporary
blocks to keep things from shifting around. The screws only go into the
bottom layer of ply, not into the floor below. This system worked well. On
the bottom, make sure the center lines match up on all pieces. On the
sides, I made a minor mis-cut and the top and bottom edges did not line up
perfectly. I chose to line up the deck edge, figuring the chine edge would
be easy to fix when the bilge panels are mounted. Alert - make sure to keep the sides with the centerlines and
bulkhead locations marked up in this step. I know I checked twice, but
somehow got the aft side sections swapped. No big deal as the shapes are
the same, but the location mark for Bulkhead 6 ended up on the outside of
the boat. |
2 hours |
 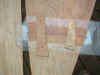 |
| 10/5/03 |
Flipped and glassed the other
side of the bottom and side joints.
Began building the strongback. Note
the lovely slope I get to contend with from here on out :(.
|
4 hours |
 |
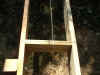
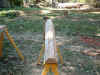
| 10/6/03 |
Finished the strongback layout. Alert - When you do this, take extra efforts to make sure the
strongback is level and square. My building techniques were not up to
snuff on this step. I managed to get the strongback level, but it is not
square. Note how far off the true center line is from the measured center
of the forward brace. Sigh. If you wind up in this situation, remember the
technique of measuring across two diagonals - if the diagonal measurements
are equal then the four corners are square. I drove a nail into each side
of the strongback at the transom, then measured the diagonals to each
station, frame, and bulkhead, and finally the forward centerline. This
way, all the important markings are square to each other even if the
strongback itself is off. It would not be a bad idea to take these
measurements as a double check even if your strong back is nominally
square.
Today also saw the final sanding of the
prefinished bulkheads and the start of mounting the bulkheads on the
strongback. It is critical to to line up the centerlines, the location
markings, and to check the plumb of each bulkhead. The height of the
transom and bulkhead 4 are shown on the plans. All the other bulkheads
need to be fit using a batten and measuring up from the station lines.
Check your plumb when measuring!
Today I also rough cut the stem using a circular
saw and belt sander to refine the shape. |
8 hours |
|
| 10/7/03 |
Finished mounting bulkheads
today, making many finicky adjustments with the batten. Lifted the bottom
onto the bulkheads. Made more finicky adjustments to get the center lines
and station heights adjusted. |
7 hours |
|
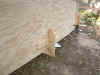
| 10/8/03 |
Fitted the sides onto the
bulkheads. Using U-shaped supports made from plywood (as suggested by
someone on the Chebacco board) made this job relatively easy. I used
three on each side, at bulkhead 6, 4, and mold 2. Make them a little
oversized and you can use wedges to hold the side in place during
adjustments. Alert - Make sure you make
the U-supports wide enough to be able to place the temporary screws out of
the way of the fiberglass tape and epoxy when you make the permanent
joint! In addition to the supports, I clamped the sides at the transom and
placed temporary screws into the stem.
Other than the !@#$ finicky adjustments to
get the bottom and chine heights just right, this was not a hard process.
I was worried that fitting the stem would be a problem, but it really was
not. Three screws through the bottom and two on each side held everything
together. I'll add that once all the adjustments to bulkhead and mold
heights were made, all the measurements came to within an eighth inch of
the plans, so it is worth persevering. If I had to do it over again, I
think I might skip some of the batten adjustments and go straight to
fitting the sides and bottom once the transom and bulkhead 4 were in
place. I found that just by aligning the deck side of the sides with the
bulkheads took care of 95% of the alignment; the rest was solved by small
adjustments at the stem. I also began gluing up the bulkheads and frames
to the bottom and
sides today. |
8 hours |

|
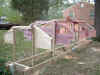
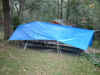
| 10/9/03 |
Removed the U-supports and
finished the glue up and filets today. This took a little longer than
expected, but was not too hard. Don't rush this step - take the time to
smooth things out as much as possible to avoid the need for extensive
sanding later.
I also set up a rain shelter as it is supposed to rain in the
next day or so.
|
8 hours |
 |
| |
|
|
|
| |
|
|
|
| |
|
|
|
| |
Go to Construction Log Page 1,
3, 4,
5, 6,
7, 8,
9 |
|
|
| |
Home |
|
|


