Labeleing WBCs
Given the Diagram Above Follow the Procedure Below
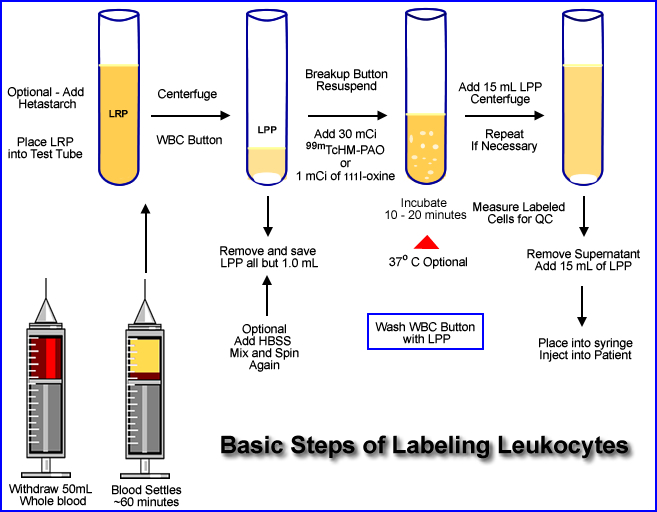
- Approximately 50 mL of whole blood is extracted from the patient. The syringe must contain an anticoagulant (1000 U of heparin or 7mL of ACD solution)
- ACD appears to be a better anticoagulant because of the improved labeling efficiency
- Collect additional whole blood to increase the amount of white cells to be labeled
- If an additional 25 mL is taken, refer to step 9
- Once the blood is collected it should be stored in an upright position. This allows the red cells and plasma to separate. This process usually takes about an hour
- Comment - It is very important to label the syringe and patient. This should prevent a misadministration (Labels are provided by the central pharmacy). Correct labeling will prevent misadministering the labeled blood to the wrong patient
- By the time the whole blood arrives at the radiopharmacy the plasma and red cells are separated
- Optional - 10 mL of hetastarch can be added to the whole blood and mixed. This enhances the sedimentation process. It adds about 45 minutes to the labeling procedure. FYI - Patient with infection tend to have higher sedimentation rates
- The leukocyte-rich plasma (LRP) is then placed in a test tube and centrifuged at 450g for 5 minutes
- This causes a formation of a WBC button (on the bottom) from the leukocyte. The solution in the test tube contains leukocyte-poor plasma (LPP)
- All but, 1.0 to 0.5 mL of the LPP is removed and stored for later use
- Optional step - If you've collected an additional 25 mL of whole blood you can extract the plasma and substitute the LLP
Optional steps 9 - 12 or go to step 13
- Application of HBSS (hypertonic saline solution) to the button
- Causes lyses of the the remaining RBCs found within the WBC button
- Some institutions do not add HBSS because it may damage the white cells
- When HBSS is added the WBC button is re-suspended with this solution, mixed, and then centrifuged again ( 450g for 5 minutes)
- Solution is then removed (button remains) and the WBCs are suspended and washed with a saline (5 mL)
- Centrifuged at 450g for 5 minutes and the solution is removed
- One mL of LLP is added, continue to step 14
- Addtion the radiotracer
- Prepare 30 mCi of 99mTc-HMPAO in a 5 mL solution
- Or slowly add 1.0 mCi of 111In-oxine with 0.5 mL of saline
- After adding the radiotracer inculbate for 20 to 30 minutes mixing the compound gently every 5 minutes
- Optional - may incubated at 37oC
- Mix 15 mL of LPP to solution and centrifuge at 450g for 5 minutes
- Remove the supernatant for assay below [A]
- Add 15 mL of LPP to the button and resuspend the labeled WBCs [B]
- Spinning the suspended cells can be repeated to remove additional unbound radiotracer (Step 17)
- The dose is placed into a syringe and is ready for patient injection
QC of the Labeled WBCs

- The percent tag can be determined by measuring the activity of the labeled button and the supernatant in step 16 and 17. This value should be between 50 to +90%
- Place a small amount of the labeled radiopharmaceutical onto a hemocytometer and add trypan blue dye. Using a microscope see if any WBCs turn blue. Those that do are dead and if the amount exceeds 10% then the labeled cells should not be injected into the patient
- Determine there is no clumping of the WBCs. This will be observed with a microscope
- Final comment - Ringers Citrate Dextrose can be used instead of saline. The theory is that the white cells need to be nourished while being incubated.